Fresh out of the box, I took my GoPro 13 and brand-new underwater photography rig for its first dive! Earlier this year, I tested the GoPro 12 with a MacroMate underwater macro lens and handheld dive torch. This time, I decided to upgrade my setup while keeping it compact for travel. If you’re looking to maximize your GoPro for scuba diving, this post is for you.
In this post
Building the Underwater Macro Setup
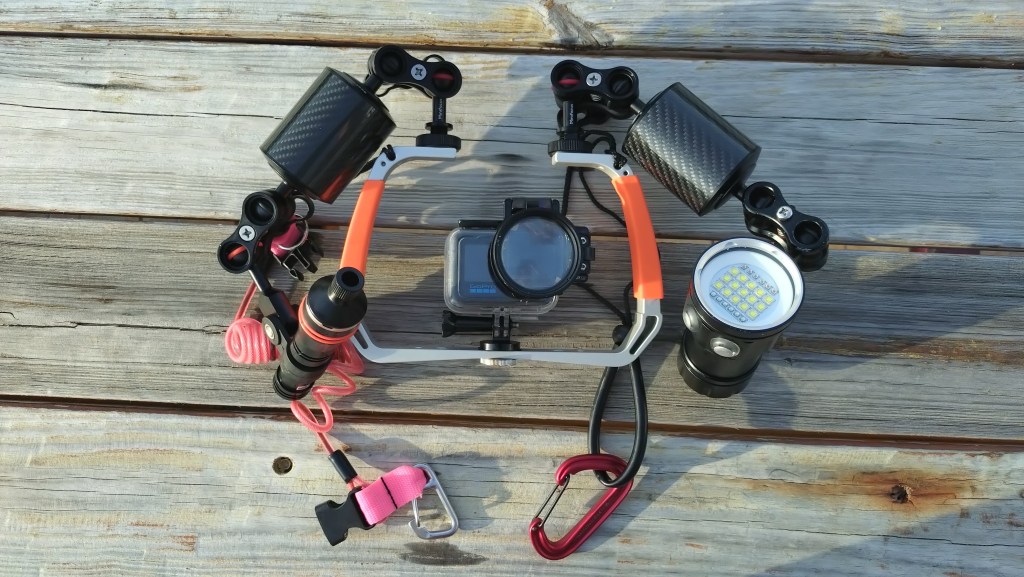
The most challenging part of building this setup was figuring out what exactly each component was called—especially the Chinese names for parts. I spent days looking at other divers’ setups online and planning my build. Since no single store carried everything I needed, I had to order from multiple Shopee vendors.
By March 15, I finally had all the parts and assembled the complete rig.
Equipment List and Costs
| Item | Description | Cost |
| Lens | +15 MacroMate Mini Underwater Macro Lens for GoPro (also +10 Close-up Lens) | $279 USD |
| Camera Tray | TELESIN Diving Rig Tray Mount (previous purchase) | NT$850 |
| Dive Torches | Archon D11V II and Asafee 20000LM XM-L2 LED | NT$1,600 + NT$2,075 |
| Arms | 5″ Double Ball Head Carbon Fiber Buoyancy Arms (x2) | NT$980 |
| Connectors | Hot Shoe Adaptor with Ball (x2) | NT$758 |
| Clamps | Butterfly Ball Clamps (x4) | NT$756 |
| Torch Mount | Archon YS-24/YS-26 + Z17 for D11V II | NT$600 |
| Stabilizer | Metal tripod mount for GoPro | NT$89 |
| Charger | 18650 Four-slot charger | NT$248 |
| Total Cost | ~NT$16,500 |
Why Not Just Buy an Underwater Camera?
At NT$16,500, you could argue I should have just bought a dedicated underwater camera. I actually considered several options:
- Underwater housing for my Sony A6000 or Canon EOS 1100D
- Olympus TG7 with housing
However, cheap underwater housings would put my DSLRs at risk, while quality housings cost significantly more. The TG7 setup would be more expensive, and I already use my GoPro regularly for other activities. These factors made the GoPro macro setup the most practical choice.
GoPro 13 Configuration
The night before diving, I set up custom settings following Backscatter’s comprehensive guide: Complete Guide For GoPro HERO13 Best Underwater Video Photo Settings.
I also practiced switching between custom settings to avoid fumbling underwater—a crucial step that paid off during the dives.
Diving in Kenting
I’ve been part of a local dive club for years. Our divemaster announces upcoming trips, and we sign up for the ones that interest us. Since I’m taking a technical diving course in June, I needed some warm-up dives. Even though Kenting isn’t my favorite dive site during this season, I signed up for the practice.
Conditions to Expect
During this season, Kenting experiences:
- Strong northeasterly winds creating rough surface conditions
- Significant currents
- Water temperatures ranging from 23.9°C to 28°C
If you want to experience and train in challenging conditions, this dive site will definitely test your skills.
Getting There and Accommodation
Our divemaster arranged everything with Taiwan Dive Center, including pickup from Zuoying HSR Station. The journey is straightforward: take the HSR from Taipei to Zuoying, then wait for the arranged pickup.
Dive Highlights
Day 0: Checkout Dive and Ocean Cleanup
Our checkout dive doubled as an ocean cleanup, removing fishing nets and trash from the seafloor. I came prepared with an empty bag, expecting to collect plastic bottles and typical garbage. However, I didn’t contribute much because I wasn’t sure what to look for, while experienced club members filled their bags to the brim with various debris.
Day 1: Testing the GoPro 13 and Macro Setup
My dive buddy in this trip is a certified dive master, so we had more freedom to explore independently while checking on each other periodically. She used an iPhone in a Divevolk underwater housing for her photography.
Equipment Challenges:
- First dive: The Asafee video light wouldn’t turn on, forcing me to learn the Archon dive torch with beam tube on the fly. Back on the boat, the video light worked fine. Lesson learned, don’t press and hold the button!
- Second dive: Successfully used both lights and practiced flipping the macro lens and positioning lighting
- Third dive: Video light failed again, so I focused on wide-angle video
- Fourth dive: Found a solution—cycling the power buttons before entering the water worked consistently.
Day 2: Buoyancy Adjustments and Skill Development
I discussed buoyancy issues with my divemaster. During ascents, especially in current, I struggled to maintain neutral buoyancy and couldn’t keep my legs down. This wasn’t a problem in still water. I suspect I lost muscle mass after getting sick during my recent Europe trip.
Adding 0.5kg of weight made a significant difference. While I needed to make adjustments at depth, I felt much safer during safety stops.
We completed two more morning dives where I continued practicing subject tracking and achieving clearer video footage.
Travel Tips
HSR Ticket Changes
We originally booked the 5:50 PM train but arrived around 4 PM. I didn’t want to wait, so I went to the ticket counter and successfully rebooked to an earlier train within minutes—no extra charge!
Bonus: Where to Eat in Kenting
Near Taiwan Dive Center
- 阿興生魚片 (A-Shin Sashimi)
Hengchun Night Market
- 古早味台式料理小館(中正店)
- Europe Love Onion Ice Cream (歐戀洋蔥冰淇淋綠豆饌) –
- Street food
Final Thoughts
Building this underwater macro photography setup was driven by pure curiosity—and yep, that’s adult money spent on a hobby project! But it was incredibly rewarding to see it come together. From completing the build to bringing it underwater, watching it work in action, and seeing it hold up against the waves and current— it was sooo satisfying.
My next dive won’t require this macro setup, so I’m hoping to experiment with it on land and see what other creative possibilities it opens up.
===
That’s it for now! Stay tuned for more adventures and tips on balancing work and travel!
🌹

Leave a comment